Rocket project
|
Rocket Reflection
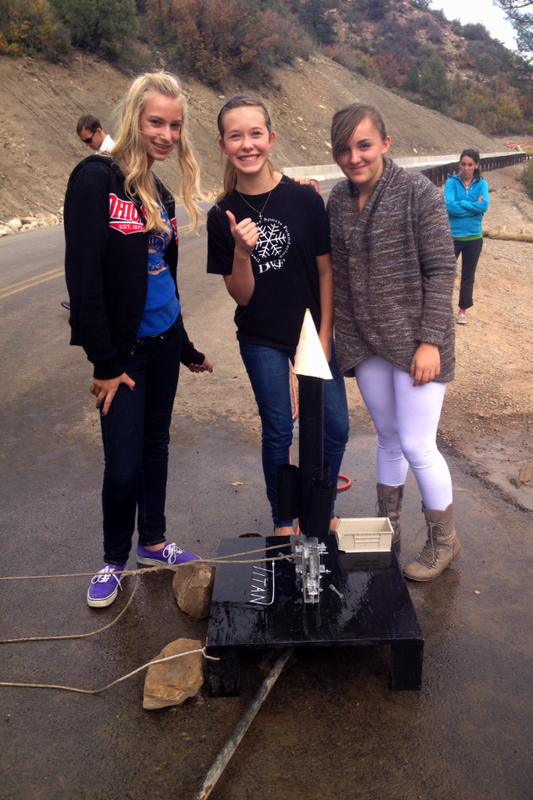
The 2013 rocket exhibition was a huge success. As a class we broke records, and had successes we have never before had. For our group though, the exhibition was good, but not great. Our group however, was great; the dynamic and people just worked. We communicated clearly and were compatible to one another. If we could go back, I would change the amount of time we took doing certain things on the rocket. For example, we could have spent a little less time worrying about the nosecone and more time worrying about straightening the wings. Our rocket was a blur of color as it flew through the air. With an array of neon colors, it was easily recognizable. When The Ninja left the Launchpad, our whole group was holding on to the hope that it would work perfectly. The ninja flew, it did but contrary to our hopes it’s majestic trash bag of a parachute did NOT deploy. I don’t think that we put as much effort as we could have into the parachute. For years following, I would recommend that everyone develop more of and a super thorough plan. I think that if you do this it will be quicker and more efficient to finish. I think about 90% of my available abilities went into this project. I think my ambition level was focused and a good place to be. Our rocket was a partial success, but we had a lot of fun! 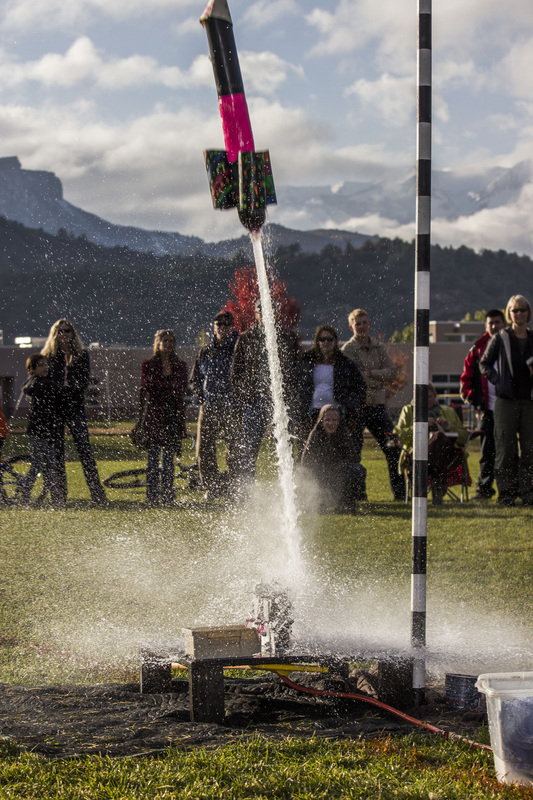
|
Rocket Journal Entries
Day 6, Journal Entry 1 Today our goal is to glue on our plexi glass fins onto our rocket. We are moving at a good speed. Day 7 Journal Entry 2 Today we want to attach our nose cone to our parachute. Our rocket was test launched, and we have decided to start our rocket over. Our rocket is really heavy and spins and flies crooked. Day 8 Journal Entry 3 Today we went back to the drawing board. We have decided to make a new rocket, with bottle fins, and a lot less glue so it is lighter. Today we will appoxy our pressure chamber. Day 9 Journal Entry 4 Today we added the third bottle to my rocket. We named it the ninja. Day 10 Journal Entry 5 Today we will paint our rocket because Grace isn’t here today and can't glue on the fins. Day 11 Journal Entry 6 Today we will complete the nose cone and parachute. We are thinking we might use a tennis ball as a nose cone. Day 12 Journal Entry 7 Today we had a rocket launch and found a hole in our pressure chamber. Day 13 Entry 8 Today we need to repair the hole in our pressure chamber, with hot glue, super glue, and duct tape. We also will make a bigger parachute. |
Rocket Project Conclusion
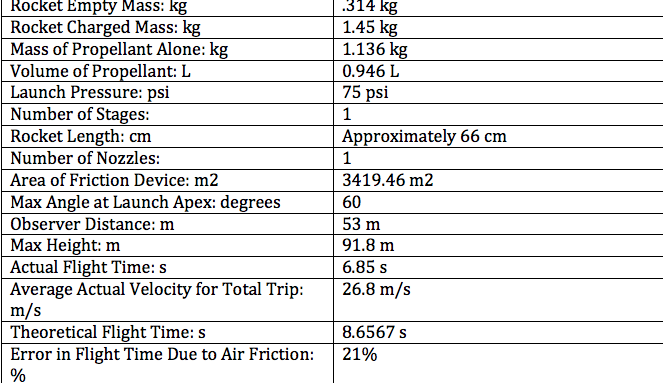
The final step in the rocket project was to make calculations for many aspects of The Ninja and put them into a data table. First we put the whole rocket operation into a giant triangle. The triangle was made up of the distance of the data table from the launch (53m), the angle the data table collected, and the height of our rocket (unknown). To find the final height of our rocket we took 53 (the distance of the observers) tan 60º and it output our height in meters, which were 91.79m. This number helped us to find the other measurements from different calculations. We then found our actual velocity, which was 26.8 m/s. after that, we calculated different flight times. The first was the actual flight time which was 6.85 s. Our theoretical flight time was 8.6567 s. Both of these times had some error from our friction device (parachute) of 21%. Our error percent was pretty low and I think this is due to the fact that our parachute only partially deployed. This caused very little friction when our rocket was plummeting towards the earth. These are the final calculations of The Ninja.
The final step in the rocket project was to make calculations for many aspects of The Ninja and put them into a data table. First we put the whole rocket operation into a giant triangle. The triangle was made up of the distance of the data table from the launch (53m), the angle the data table collected, and the height of our rocket (unknown). To find the final height of our rocket we took 53 (the distance of the observers) tan 60º and it output our height in meters, which were 91.79m. This number helped us to find the other measurements from different calculations. We then found our actual velocity, which was 26.8 m/s. after that, we calculated different flight times. The first was the actual flight time which was 6.85 s. Our theoretical flight time was 8.6567 s. Both of these times had some error from our friction device (parachute) of 21%. Our error percent was pretty low and I think this is due to the fact that our parachute only partially deployed. This caused very little friction when our rocket was plummeting towards the earth. These are the final calculations of The Ninja.
Rube Goldberg Project
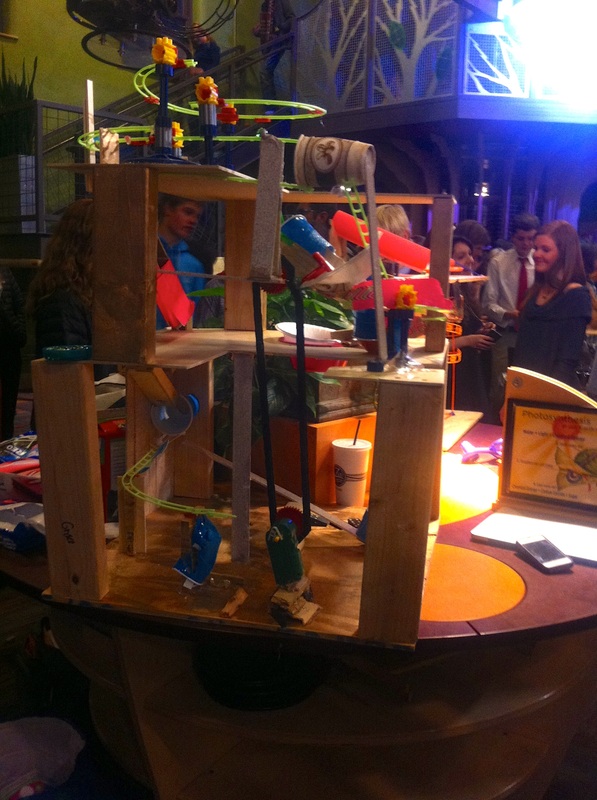
RUBE GOLDBERG: A SERIES OF COMPLICATED STEPS IN ORDER TO COMPLETE ONE SIMPLE TASK.
Sketch Up of Our Rube
|
A Rube Goldberg is a type of invention/machine that is created in many classrooms and in real life. The requirements of this project were to make a reasonably well functioning personal Rube. The end task for our RG was to drop cookies into milk. We all did planning and I think that we all put a lot of effort into this project. However, even with our hard work and effort our Rube was not very successful. It was disappointing because it didn’t work at exhibition, but at the same time I was happy that we really tried. My partners were Anne Chase and Gabe Garcia. It was really fun working with them and I would happily do it again. Overall, this project was a great one. It forced us to use logical and hard thinking skill and got us up and out of our seats.
|
|
Twin butte topographical map
|
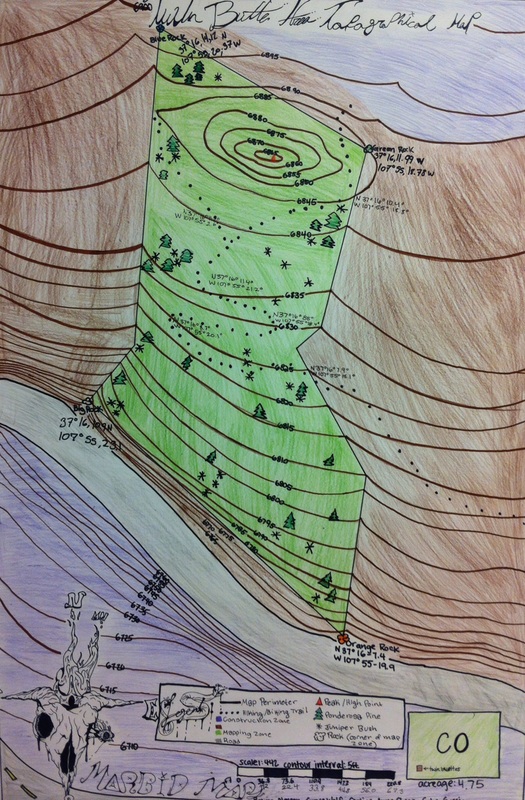
Methodology Behind the Map
Anne Chase, Brynn Nelson, Grace Wolf, Gabe Garcia During this project we made a topographic map of a small area in the Twin Buttes above our school. In order to do so, the first step was to measure the bearings and paces. Since the corners of our mapping area where already plotted, we went to the bottom corner of the mapping area and counted the paces in-between each major bend all the way around. We measured the latitude and longitude degrees with a compass in-between each bend as well. To turn this information into our map, we took the number of paces and turned it into a smaller scale in order to make it fit onto the paper properly. After we had this number, we took a protractor and recorded the same number of degrees we had previously recorded, we continued to draw the lines the right length and in the direction we had recorded until we had completed the whole map perimeter. Google Earth helped us plot contour lines by showing us not only the basic shape that the map should be but also basic grade changes throughout the area to draw our lines by. Contour lines are the lines on a topographic map that show differences in the elevation. Someone may need a topo map to see which path is the roughest, making It easier to decide where they should go or hike. Spatial awareness was needed in this project to show us the position of objects in relative to other objects via north, east, south, and west. This project showed us how to record certain area of terrain efficiently and so in a very effective way. |
